DIY painting ideas offer a fantastic way to personalize your home, inject creativity into your surroundings, and save money. Whether you’re a seasoned artist or a novice with a paintbrush, the world of DIY painting is brimming with possibilities. From vibrant wall designs to stylish furniture makeovers, there’s a project for every skill level and aesthetic preference.
This guide will delve into the diverse realm of DIY painting, covering everything from essential tips and techniques to inspiring project ideas and safety considerations. We’ll explore various painting styles, discover budget-friendly solutions, and even draw inspiration from professional painters.
Introduction to DIY Painting
DIY painting is a fantastic way to refresh your home, express your creativity, and save money. Whether you’re a seasoned painter or a complete beginner, there’s a DIY project waiting for you. This guide will provide you with the essentials to get started and inspire you with creative ideas.
Benefits of DIY Painting
DIY painting offers numerous benefits, making it a popular choice for homeowners and renters alike. Here are some of the key advantages:
- Cost Savings: DIY painting allows you to control your budget and potentially save significant money compared to hiring a professional painter. You can purchase the necessary materials at your own pace and avoid paying labor costs.
- Creative Expression: DIY painting provides an excellent opportunity to unleash your creativity. You can choose colors, patterns, and techniques that reflect your personal style and create a space that truly feels like your own.
- Personalized Touch: DIY painting allows you to personalize your home with unique touches that reflect your personality and interests. You can create accent walls, murals, or decorative elements that enhance the character of your space.
Essential Tools and Materials
Before you start painting, it’s crucial to gather the necessary tools and materials. Here’s a list of essentials for beginners:
- Paintbrushes: Choose a variety of brush sizes for different areas and paint types. For example, a 2-inch brush is ideal for large areas, while a 1-inch brush is suitable for trim work. A small brush is useful for detailed work.
- Paint Rollers: Use paint rollers for covering large areas quickly and efficiently. Choose a roller with a nap length appropriate for the surface you’re painting. A 1/4-inch nap is suitable for smooth surfaces, while a 3/8-inch nap is better for textured surfaces.
- Paint Tray: A paint tray is essential for holding and applying paint with a roller. Look for a tray with a gridded liner to help remove excess paint from the roller.
- Drop Cloths: Protect your floors and furniture from paint splatters with drop cloths. You can use canvas drop cloths, plastic sheeting, or old newspapers.
- Painter’s Tape: Use painter’s tape to create clean lines and protect areas you don’t want to paint. Choose a tape that is specifically designed for painting and will not damage your surfaces.
- Paint Stir Stick: A paint stir stick is essential for thoroughly mixing paint before and during application.
- Paint: Choose the right type of paint for your project. For interior walls, latex paint is a popular choice. For exterior surfaces, acrylic paint is durable and weather-resistant.
- Primer: Primer helps to create a smooth, even surface for paint to adhere to. It’s especially important for previously painted surfaces or surfaces with imperfections.
Inspiring DIY Painting Projects
Here are some inspiring examples of DIY painting projects to get your creative juices flowing:
- Accent Wall: Create a focal point in your living room or bedroom by painting an accent wall in a bold color or unique pattern. This is a simple way to add personality and visual interest to your space.
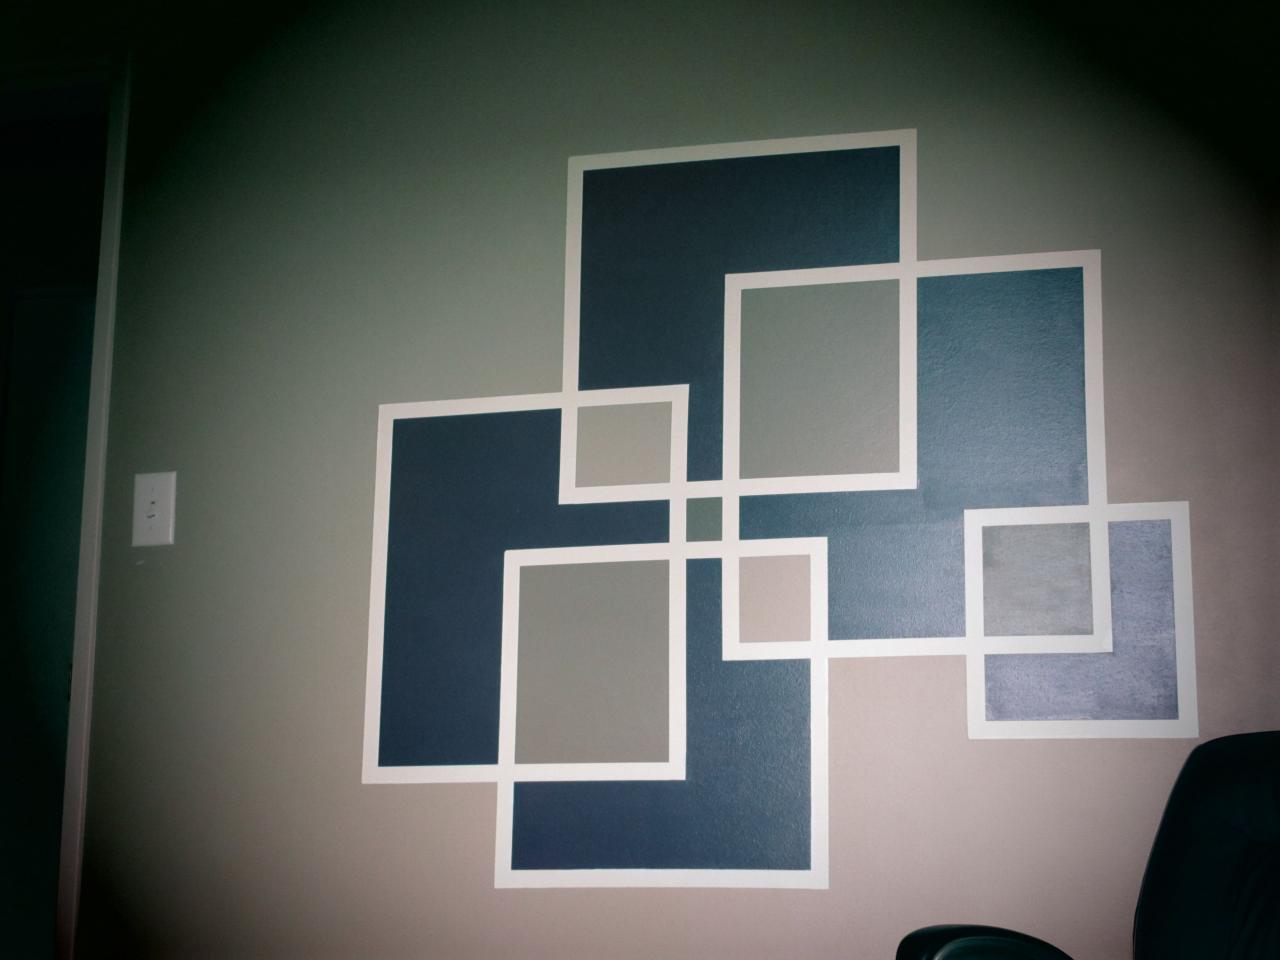
- Geometric Patterns: Use painter’s tape to create geometric patterns on your walls. You can create stripes, squares, or more complex designs. This is a trendy and modern way to add visual interest to your space.
- Stencils: Use stencils to create decorative patterns on your walls or furniture. Stencils are available in a wide variety of designs, from floral motifs to geometric patterns.
- Faux Finishes: Learn techniques for creating faux finishes, such as marbleizing, sponging, or distressing. These techniques can add depth and texture to your walls and furniture.
- Upcycled Furniture: Give old furniture a new lease on life with a fresh coat of paint. You can transform an old dresser into a modern statement piece or give a tired coffee table a new look.
Wall Painting Ideas: Diy Painting Ideas
Wall painting is a fantastic way to transform your space and give it a fresh, personalized look. It can be as simple as a single accent wall or as elaborate as a multi-colored mural. With a little creativity and effort, you can achieve stunning results that reflect your unique style.
Wall Painting Techniques
Different techniques can be used to create unique wall designs. Here are some popular options:
Color Blocking
Color blocking involves dividing a wall into sections and painting each section a different color. This technique can be used to create a bold and modern look, or a more subtle and sophisticated design.
- Example: Paint the top half of a wall a deep blue and the bottom half a soft white. This will create a dramatic and eye-catching effect.
- Step-by-Step:
- Measure and mark the wall to divide it into sections.
- Use painter’s tape to create clean lines between the sections.
- Paint each section a different color.
- Remove the painter’s tape once the paint is dry.
Ombre Effects
Ombre is a gradual transition from one color to another. It can be used to create a soft and ethereal look, or a more dramatic and vibrant effect.
- Example: Start with a light blue at the top of the wall and gradually blend it into a darker blue at the bottom.
- Step-by-Step:
- Mix two shades of the same color, one light and one dark.
- Apply the lightest shade to the top of the wall and gradually blend it into the darker shade as you move down the wall.
- Use a sponge or brush to blend the colors together smoothly.
Geometric Patterns
Geometric patterns are a popular trend in interior design. They can be used to create a modern and sophisticated look, or a more playful and eclectic feel.
- Example: Paint a grid of squares or triangles on the wall.
- Step-by-Step:
- Use painter’s tape to create the desired pattern on the wall.
- Paint the sections within the pattern a different color than the background.
- Remove the painter’s tape once the paint is dry.
Using Stencils for Unique Designs
Stencils are a great way to add unique designs to your walls without having to be a skilled artist. They come in a variety of shapes and sizes, so you can find one that fits your style.
- Benefits: Stencils are easy to use and can be applied to any type of wall surface.
- Example: Use a stencil to create a repeating pattern of flowers, leaves, or geometric shapes.
- Step-by-Step:
- Choose a stencil that fits your style and the size of your wall.
- Secure the stencil to the wall using painter’s tape.
- Apply paint to the stencil using a brush or roller.
- Remove the stencil carefully once the paint is dry.
Wallpaper as an Alternative to Painting
Wallpaper is a great alternative to painting if you want a more dramatic and unique look. It comes in a wide variety of styles and patterns, so you can find something that suits your taste.
- Benefits: Wallpaper is easy to apply and can be removed without damaging the wall.
- Example: Use a bold floral wallpaper to create a statement wall in your living room.
Furniture Painting Ideas
Giving your old furniture a new lease on life with paint is a fantastic way to refresh your home décor without breaking the bank. Furniture painting opens up a world of creative possibilities, allowing you to personalize your space with unique and stylish pieces.
Furniture Painting Styles
There are numerous furniture painting styles that can transform your old furniture into statement pieces. Here are some popular options:
- Distressed: This technique involves creating a worn, vintage look by sanding back the paint in certain areas to reveal the underlying wood or previous layers of paint. It adds a touch of rustic charm and creates a timeless appeal.
- Metallic: Metallic paints offer a luxurious and modern finish. They come in various shades, from gold and silver to copper and bronze, adding a touch of glamour to any piece.
- Chalkboard: Chalkboard paint allows you to create a functional and decorative surface. You can personalize it with messages, artwork, or even use it as a to-do list. It’s perfect for adding a touch of whimsy to furniture pieces.
Preparing Furniture for Painting
Proper preparation is crucial for a successful furniture painting project. Here’s a step-by-step guide:
- Clean the furniture thoroughly with a mild detergent and water. Remove any dirt, grease, or grime that could prevent the paint from adhering properly.
- Sand the furniture surface using sandpaper. This helps create a smooth surface and allows the paint to adhere better. For smooth surfaces, use fine-grit sandpaper (220-grit), and for rougher surfaces, use a coarser grit (120-grit).
- If the furniture has any imperfections, fill them with wood filler. Allow the filler to dry completely before sanding it smooth.
- Prime the furniture with a primer suitable for the type of paint you’ll be using. This helps the paint adhere better and provides a smooth, even surface.
Choosing the Right Paint and Color
Choosing the right paint and color for your furniture can make a significant difference in the final look. Here are some tips:
- Consider the style of the furniture and the overall aesthetic of your room. Choose a paint that complements the existing décor and enhances the furniture’s design.
- For a smooth, durable finish, opt for latex paint. It’s easy to clean and dries quickly.
- For a more rustic or vintage look, consider using chalk paint. It’s known for its matte finish and ability to adhere to various surfaces.
- When choosing a color, consider the lighting in the room. Lighter colors tend to reflect light, making the space feel larger, while darker colors can create a cozy atmosphere.
Decorative Painting Techniques
Decorative painting techniques are a fantastic way to add depth, texture, and visual interest to your walls, furniture, and other surfaces. They involve using different tools and techniques to create unique finishes that mimic natural materials, historical styles, or abstract patterns. These techniques can transform a plain surface into a work of art, adding personality and charm to your home.
Faux Finishes
Faux finishes are techniques that create the illusion of different materials, such as wood, stone, or metal, on a surface. They can be used to add elegance, sophistication, or a rustic touch to your home.
- Color Wash: This technique involves applying a thin layer of diluted paint over a base coat, creating a translucent effect. It can be used to create a subtle, aged look or a more dramatic, layered effect.
- Glazing: Similar to color wash, glazing involves applying a thin layer of transparent glaze over a base coat. Glazes are typically oil-based and can be used to create depth, highlights, and shadows.
- Rag Rolling: This technique involves using a crumpled rag or sponge to apply paint, creating a textured, uneven effect that mimics the look of stone or wood.
- Sponging: This technique involves using a sponge to apply paint, creating a dappled, textured effect. It can be used to create a subtle, distressed look or a more dramatic, multi-colored pattern.
- Stippling: This technique involves using a stippling brush to create a series of small dots, creating a textured, speckled effect.
To achieve a successful faux finish, it’s important to understand the principles of color theory and design. You should consider the colors you’re using, their values, and how they will interact with each other. You should also consider the size and shape of the room, the amount of natural light, and the overall style of your home.
DIY painting ideas are a great way to express your creativity and add a personal touch to your home. You can create everything from abstract art to landscapes, or even try your hand at painting a portrait. If you’re looking for a fun and unique Valentine’s Day gift, consider making a DIY painting for your loved one.
DIY valentines are a great way to show your appreciation and thoughtfulness, and they can be just as meaningful as a store-bought card. After all, the best DIY painting ideas are the ones that come from the heart.
Marbling
Marbling is a technique that creates the illusion of veined marble on a surface. It involves using a combination of paints and a marbling medium to create swirling, abstract patterns.
- Materials: You’ll need a marbling tray, marbling medium, acrylic paints, a brush, a toothpick, and a piece of paper or a canvas.
- Preparation: Pour the marbling medium into the tray. Add drops of different colors of acrylic paint to the medium. The paints should be thin enough to spread easily.
- Swirling: Use a toothpick to swirl the paints together, creating abstract patterns. You can use different techniques to create different effects, such as dragging the toothpick through the paint, swirling it in circles, or creating lines.
- Applying: Carefully place the paper or canvas onto the surface of the medium. Let the paper or canvas sit for a few seconds, then gently lift it up.
- Drying: Allow the marbled surface to dry completely before handling.
Marbling is a technique that requires practice and patience. It can be used to create a variety of effects, from subtle, understated patterns to bold, dramatic designs. Marbling can be used on a variety of surfaces, including walls, furniture, and even fabrics.
Sponging
Sponging is a technique that involves using a sponge to apply paint, creating a textured, dappled effect. It can be used to create a variety of looks, from subtle, distressed effects to bold, multi-colored patterns.
- Materials: You’ll need a sponge, acrylic paints, a tray, and a brush.
- Preparation: Pour the paint onto the tray. Dip the sponge into the paint and then dab it onto a piece of paper or a canvas to remove excess paint.
- Applying: Gently dab the sponge onto the surface, creating a textured, dappled effect. You can use different colors of paint to create a multi-colored pattern.
- Blending: You can blend the colors by dabbing the sponge with different colors of paint. You can also use a brush to blend the colors more evenly.
Sponging is a versatile technique that can be used on a variety of surfaces, including walls, furniture, and even fabrics. It can be used to create a variety of looks, from subtle, distressed effects to bold, multi-colored patterns.
Painting Projects for Different Rooms
Painting projects can transform the look and feel of any room in your home. By choosing the right colors and techniques, you can create a space that reflects your personal style and enhances your mood. This section will explore some painting project ideas for different rooms, including bedrooms, living rooms, and kitchens, along with the color psychology behind each project.
Bedroom Painting Projects
A bedroom should be a sanctuary where you can relax and unwind. Color psychology suggests using calming colors like blues, greens, and purples to create a peaceful atmosphere. Here are some painting project ideas for your bedroom:
- Accent Wall: Paint one wall a bold color, such as a deep teal or lavender, to add a focal point to the room. The remaining walls can be painted a lighter shade of the same color or a neutral color, like white or gray.
- Ombre Effect: Create a gradual transition from one color to another on a single wall. This technique can add depth and dimension to the room. For example, you could use shades of blue, starting with a dark blue at the bottom and transitioning to a lighter blue at the top.
- Geometric Patterns: Paint geometric patterns on one or more walls using painter’s tape. This can add a modern and stylish touch to the room. You can use contrasting colors or shades of the same color to create different effects.
Living Room Painting Projects
The living room is often the heart of the home, where families gather and entertain guests. Consider using warm colors like yellows, oranges, and reds to create a welcoming and inviting atmosphere. Here are some painting project ideas for your living room:
- Feature Wall: Paint a single wall a bold color, such as a rich burgundy or a deep green, to create a dramatic focal point. The remaining walls can be painted a lighter shade of the same color or a neutral color, like white or beige.
- Stripes: Paint vertical or horizontal stripes on one or more walls. This can add a sense of movement and energy to the room. Use contrasting colors or shades of the same color to create different effects.
- Faux Finish: Create the look of textured walls using a faux finish technique. This can add visual interest and depth to the room. Common faux finish techniques include sponging, ragging, and distressing.
Kitchen Painting Projects
The kitchen is a space for cooking, eating, and socializing. Using bright and cheerful colors like yellows, greens, and blues can create a lively and energetic atmosphere. Here are some painting project ideas for your kitchen:
- Cabinet Refacing: Paint your kitchen cabinets a fresh new color to give them a new look. You can choose a bold color like red or blue, or opt for a more neutral shade like white or gray. Consider using a high-gloss paint for a modern and polished look.
- Backsplash: Paint a backsplash behind your sink or stove. You can use a solid color, a pattern, or a faux finish to create a unique and stylish look. Choose a color that complements your cabinets and countertops.
- Accent Wall: Paint one wall a bold color, such as a bright yellow or a cheerful green, to add a focal point to the room. The remaining walls can be painted a lighter shade of the same color or a neutral color, like white or beige.
Safety Precautions for DIY Painting
Painting projects can be fun and rewarding, but it’s essential to prioritize safety while working with paint. Taking proper precautions will help you avoid injuries and ensure a smooth painting experience.
Protective Gear, Diy painting ideas
Wearing appropriate protective gear is crucial when handling paint. This helps shield you from harmful fumes, splashes, and skin irritation.
- Masks: A respirator mask is recommended for proper protection from paint fumes. Choose a mask with an appropriate filter for the type of paint you’re using.
- Gloves: Disposable nitrile gloves provide excellent protection against paint and solvents. They prevent skin irritation and allow for easy disposal after use.
- Eye Protection: Safety goggles or glasses protect your eyes from paint splashes and fumes. They should be comfortable and fit snugly to ensure adequate protection.
Ventilation
Proper ventilation is essential for working with paint, especially in enclosed spaces.
- Open Windows and Doors: Ensure adequate airflow by opening windows and doors to allow fresh air to circulate.
- Fans: Use fans to draw out fumes and create a more ventilated environment.
- Respirator Mask: Even with ventilation, a respirator mask is still crucial to protect yourself from paint fumes.
Storing and Disposing of Paint
Storing and disposing of paint products safely is essential for environmental protection and personal safety.
- Storage: Store paint in a cool, dry place, away from direct sunlight and heat. Keep paint containers tightly sealed to prevent spills and evaporation.
- Disposal: Never pour paint down the drain. Contact your local waste management facility for proper disposal guidelines. Some communities offer paint recycling programs.
Budget-Friendly DIY Painting Solutions
Painting projects can be a great way to refresh your home, but the cost of paint can quickly add up. Fortunately, there are many ways to make your DIY painting projects more budget-friendly without sacrificing quality. This section will explore some affordable alternatives to expensive paint products, tips for maximizing paint coverage and minimizing waste, and creative ideas for repurposing and upcycling materials for your painting projects.
Affordable Paint Alternatives
Finding affordable paint alternatives can significantly reduce your overall project cost. Here are some options to consider:
- Sample Pots: Hardware stores often sell small sample pots of paint, which are a great way to try out different colors before committing to a full gallon. This can be particularly helpful for accent walls or smaller projects.
- Contractor-Grade Paint: Contractor-grade paint is often less expensive than premium brands but still offers good quality and coverage. It’s a great option for large projects where color accuracy is less critical.
- DIY Paint Mixing: You can create custom paint colors by mixing leftover paint or purchasing basic colors and mixing them to achieve the desired shade. This can save you money, especially if you need a specific color that’s not readily available.
- Chalk Paint: Chalk paint is a versatile and affordable option for furniture painting. It’s easy to use and provides a matte finish that can be distressed for a vintage look.
Maximizing Paint Coverage and Minimizing Waste
Stretching your paint budget further can be achieved by maximizing paint coverage and minimizing waste. Here are some practical tips:
- Proper Preparation: Thoroughly preparing the surface you’re painting is crucial for optimal paint coverage. This includes cleaning, sanding, and priming the surface, which ensures the paint adheres well and you use less paint.
- Thinning Paint: Adding a small amount of water or paint thinner to your paint can increase its coverage, allowing you to stretch your paint further. Follow the manufacturer’s instructions for thinning ratios.
- Using a Roller: Rollers are more efficient than brushes for covering large areas, resulting in less paint waste.
- Storing Leftover Paint: Properly store leftover paint to use for touch-ups or future projects. Store it in airtight containers in a cool, dry place.
Repurposing and Upcycling Materials for Painting Projects
Repurposing and upcycling materials can add unique character to your painting projects while saving you money. Here are some ideas:
- Using Old Paint Cans: Don’t throw away old paint cans! They can be repurposed as planters, storage containers, or even decorative elements. Clean them thoroughly and paint them with a fresh coat of paint for a unique look.
- Repurposing Fabric Scraps: Use fabric scraps to create stencils or patterns for your painting projects. Cut out shapes or designs from fabric and secure them to the surface with painter’s tape.
- Upcycling Old Furniture: Give old furniture a new lease on life with a fresh coat of paint. You can transform a tired dresser into a statement piece or give an old chair a modern look.
- Creating Art with Found Objects: Use found objects like bottle caps, buttons, or broken pieces of pottery to create unique textures and patterns in your paintings.
Inspiration from Professional Painters
Professional painters, with their mastery of technique and artistic vision, offer a wealth of inspiration for DIY enthusiasts. Their work not only showcases the beauty and power of paint but also provides valuable insights into the world of color, composition, and artistic expression. By studying their techniques and understanding the impact of different art movements, you can elevate your own DIY painting projects to new heights.
Exploring Renowned Painters and Their Techniques
The works of renowned painters offer a captivating glimpse into the evolution of artistic expression and the diverse techniques that have shaped the world of painting. Studying their techniques can provide invaluable insights for DIY enthusiasts.
- Leonardo da Vinci: Known for his meticulous attention to detail and mastery of sfumato, a technique that creates subtle transitions between colors and shadows, da Vinci’s works, such as the Mona Lisa, exemplify the power of realism and the beauty of subtle shading.
- Vincent van Gogh: His vibrant use of color and bold brushstrokes, exemplified in works like “Starry Night,” are a testament to the emotional power of expressionism. His paintings showcase the use of impasto, a technique where thick layers of paint are applied to the canvas, creating a textured surface.
- Claude Monet: A pioneer of Impressionism, Monet’s works, such as “Water Lilies,” capture the fleeting beauty of light and its effect on the environment. His use of broken brushstrokes and pure, vibrant colors exemplifies the Impressionist movement’s emphasis on capturing the moment and the play of light.
Impact of Art Movements on DIY Painting Trends
Art movements have significantly influenced the way we approach painting, both professionally and in DIY projects. Understanding the impact of these movements can provide inspiration and direction for your own artistic endeavors.
- Modernism: This movement, which emerged in the early 20th century, emphasized abstraction, geometric forms, and a departure from traditional representational art. Modernist influences can be seen in contemporary interior design trends, with bold colors, geometric patterns, and abstract art finding their way into homes.
- Pop Art: This movement, which emerged in the 1950s, embraced popular culture and everyday objects as subjects for art. Its influence is evident in the use of bright colors, bold graphics, and iconic imagery in DIY painting projects, such as creating murals inspired by pop culture icons or incorporating bold geometric patterns in furniture painting.
- Minimalism: This movement, which emphasizes simplicity and functionality, has influenced DIY painting trends by promoting the use of neutral colors, clean lines, and a focus on creating a sense of calm and serenity. Minimalist principles can be applied to DIY projects by using a limited color palette, creating simple geometric patterns, and focusing on the overall aesthetic of the space.
Learning from Professional Painters
There are numerous resources available for learning from professional painters and incorporating their techniques into your DIY projects.
- Online Tutorials: Websites and platforms like YouTube offer a wealth of tutorials from professional artists, covering various techniques, from basic brushstrokes to advanced painting methods. These tutorials can provide step-by-step instructions and visual demonstrations, making it easier to learn and apply new techniques.
- Workshops and Classes: Local art centers, community colleges, and private studios often offer workshops and classes led by professional painters. These hands-on experiences provide an opportunity to learn directly from experts, receive personalized feedback, and experiment with different techniques in a supportive environment.
- Art Books and Magazines: Numerous books and magazines dedicated to painting offer detailed explanations of techniques, artist profiles, and inspirational projects. These resources can provide a deeper understanding of different painting styles and techniques, expanding your knowledge and creative possibilities.
Final Conclusion
Embarking on a DIY painting journey can be both rewarding and transformative. By exploring different techniques, experimenting with colors, and unleashing your creative spirit, you can breathe new life into your home. Whether you’re seeking a bold statement or a subtle touch of personalization, DIY painting empowers you to create spaces that reflect your unique style and personality.

